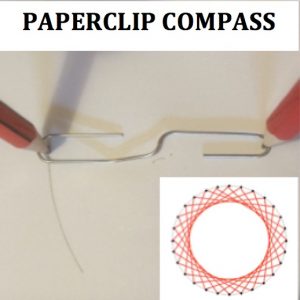
 The picture shows you how to use a paper clip to draw circles. You just need to open out the paper clip as shown,
- Draw a circle and mark 24 points equally spaced around the circumference. To do this, draw a circle and mark the centre, and mark your first point on the circumference.
- With a protractor, starting from the radius from the centre to your 1st point, accurately measure an angle of 15 degrees at the centre of the circle and mark the second point on the circumference. Can you explain why we use the angle 15 degrees?
 Continue to measure angles of 15o and to mark equally spaced points around the circle. Then join each point to the 5th point around the circle missing 4 points between.
The inner circle that you see is called the ENVELOPE to the family of straight lines you have drawn. The lines are tangents to the envelope curve. Call this envelope n=24, s=5..
Experiment with different numbers of points around a circle, always joining points with straight lines and counting the same number of points between them.
What pattern would you get if you joined every 8th point on the 24 point circle?
The envelope shown above is named n=28, s = 7 . It is formed by marking 28 points around a circle and joining each point to the 7th point around the circle, missing 6 points between them. This is more difficult to draw accurately because the angle required is 360/28 = 12.86o (to 2 decimal places).
Click here to download the CIRCLE AND LINE PATTERNS poster.
Click here to download the CIRCLE AND LINE PATTERNS worksheet.
Click here for the Notes for Teachers.
Click to download the poster.
If you enjoyed this article, please consider sharing it!


FOLLOW US ON SOCIAL MEDIA


